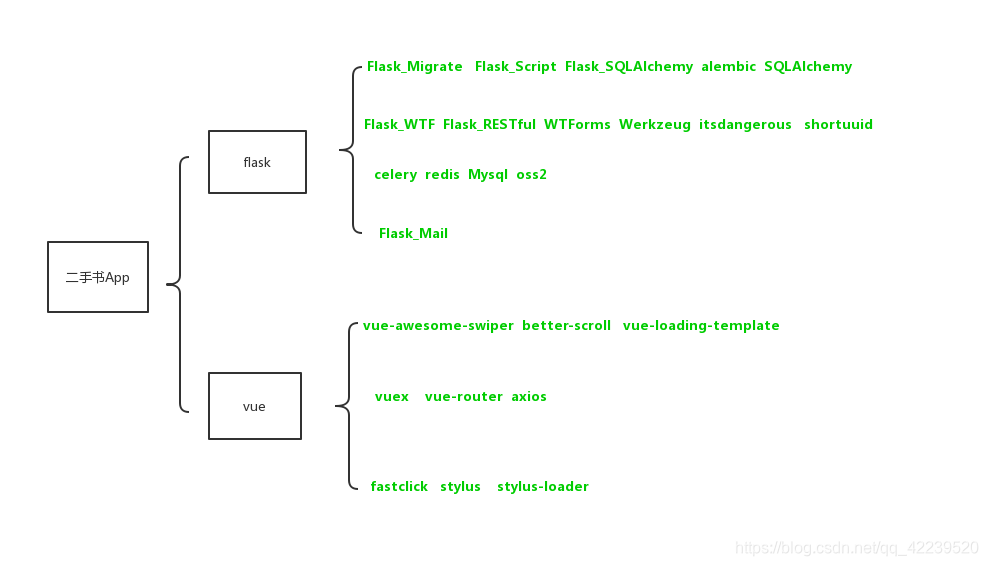
一个Flask + vue 前后端分离的 二手书App
效果展示:
https://blog.csdn.net/qq_42239520/article/details/88534955所用技术清单
 项目地址: vue代码地址:
 项目部分过程笔记:
后台:
项目结构
Secondhanbook / 项目目录 apps v1 __init__.py 导入 urls urls.py 路由配置 forms.py models.py views user_views.py 用户相关视图 book_vews.py 书籍相关视图 config.py 配置文件 run.py 项目启动文件 manage.py 数据库迁移文件 Secondhanbook.py 初始化文件 utils 工具类目录 ...... ......
1. Flask_RESTful 的返回 和 缓存时候的自定义返回
flask_restful 在视图方法上加上marshal_with 装饰器,并传递你返回的模式。但当自定义时,需要返回自己的模式
return marshal(books,self.resource_fields,envelope='data') resource_fields:自定义返回模式 data: 返回时,数据包装
2. 使用Flask_RESTful 下表单验证以及csrf防御
每当用户进入提交Post请求的页面,实例化一个表单form,返回csrf_token
csrf_token = form.csrf_token.current_token return restful.success(data=csrf_token)
3.路由配置
api = Api(prefix='/api')#用户相关api.add_resource(Login,'/login/',endpoint='login') ......#书籍相关api.add_resource(BookAddView,'/bookadd/',endpoint='bookadd')......
4.使用itsdangerous生成临时身份令牌
生成令牌def generate_auth_token(self,expiration=172800):#两天过期 s = Serializer(config.BaseConfig.SECRET_KEY,expires_in=expiration) return s.dumps({'id':self.id}) 身份检验
def verify_auth_token(token): s = Serializer(config.BaseConfig.SECRET_KEY) try: data = s.loads(token) except Exception as e: return None user = FrontUserModel.query.get(data['id']) return user
5.配置文件的书写方式,类继承的方式
class BaseConfig(object): passclass DevelopmentConfig(BaseConfig): passclass OnlineConfig(BaseConfig): pass
6. celery 处理费时任务
@celery.taskdef send_mail(subject,recipients,user_id): ......@celery.taskdef BookCacheAdd(books): ......
7.redis 存储数据bytes 问题解决
cache = redis.StrictRedis(host='127.0.0.1',port=6379,db=0,decode_responses=True)
8. 封装jsonfy的返回
class HttpCode(object): Ok = 200 ParamerError = 400 Unauth = 401 ServerError = 500def RestfulResult(code,message,data): return jsonify({'code':code,'message':message,'data':data})def success(message="",data=None): return RestfulResult(HttpCode.Ok,message=message,data=data)...... 9.对axios 提交bytes类型数据进行form验证
from werkzeug.datastructures import MultiDict ...... myform = json.loads((request.data.decode('utf-8'))) form = LoginForm(MultiDict(myform)) ...... 10. flask 接收 接收多个文件axios 上传的多个文件
** AddBookView ** files = request.files for file in files.values(): filename = upload.change_filename(secure_filename(file.filename)) **upload.vue** for (var i = 0; i < this.files.length; i++) { this.formdata.append('file' + i, this.files[i]) } axios.post('api/bookadd/', this.formdata, { headers: {'Content-Type': 'multipart/form-data'} }).then(this.handleAxiosDone) 11.表单对files, 输入字段验证
from werkzeug.datastructures import CombinedMultiDictform = Yourform(CombinedMultiDict([request.form, request.files])) // 合并 数据和文件文件验证:定义表单时,采用FileField这个类型验证器导入:flask_wtf.file flask_wtf.file.FileRequired 验证是否为空flask_wtf.file.FileAllowed 验证上传文件后缀名
前台部分知识点:
项目结构
......src common footer 页脚 alert 提示 fade 动画 gallary 画廊 ...... store ... vuex相关 pages home components header.vue ...... Home.vue detail me sign ............
1. flask_result 返回时,提供默认值
返回数据时,当axios 未返回渲染到页面时,使用变量出错。 **** 解决方法: 定义默认值 例如有使用book.owner.username , book.owner.avatar时,否则报错无定义,并无法显示。book: { owner: {......Object} }, 2. vuex store一个Message,供于消息提醒
项目基本上每个页面都有操作结果的提醒,封装一个消息提醒的组件 alert.vue{ {mymessage}}...... computed: { mymessage () { return this.$store.state.message } }, watch: { mymessage (e) { this.isshow = true } }
state: { message: '默认值', color: '' }, mutations: { msgchange (state, res) { state.message = res.message // color 自定义消息 state.color = res.color // color 自定义颜色 setTimeout(() => { state.message = '' state.color = '' }, 3000) } } **** 重点:必须重置,否则下一次一样的消息将不显示组件写一个发送提醒消息的方法,方便多次调用handleemit (message, color) { this.$store.commit('msgchange', {message: message, color: color})} 3. 登陆注册:
利用 vue mounted 生命周期函数请求后端返回的csrf_token , 以及检验本地 localStorage,token是否过期。首次登陆成功返回存储tokenlocalStorage.setExpire('token', res.headers.token, 1000 * 60 * 60 * 24 * 2) // 设置两天过期 注册发送email 激活账号 4 . 使用better-scroll 加载更多
swiper 盒子必须小于content高度才能滚动可以滚动后,页面将不能点击,解决:**** this.scroll = new BScroll(this.$refs.wrapper, { click: true, ......监听下拉方法,加载更多 pullUpLoad: { // 当上拉距离超过盒子高度的的时候,就派发一个上拉加载的事件(触发条件) threshold: 0 }监听事件 this.scroll.on('pullingUp', () => { axios.get('/api/booklist/?start=' + this.start).then(this.handleAxiosSuccess) }) *** 对于下拉加载更多,双重遍历,遍历页码对应的数据v-for="(p,index) in page" v-for="item in booklist[index]" :key="item.id" // booklist[index] 为第几次下拉的返回的数据 5. vue-awesome-swiper
图片点击事件监听事件: on: { click: function (e) { window.open(e.target.src) // 跳转到网页 } } 使用: swiperOption为参数{ loop: true,effect: 'fade'......} ![]() // 传递图片url
// 传递图片url 画廊 组件关键参数: // observer启动动态检查器(OB/观众/观看者),当改变swiper的样式(例如隐藏/显示)或者修改swiper的子元素时,自动初始化swiper。 // 默认false observer: true, observeParents: true 6. 过滤器,传递data中的值,并且使用v-html 显示
v-html="$options.filters.filemotion(comment.content,emotions)" // emotions: [] 是data中自定义的值本过滤器是对,表情的插入表情标签的过滤 [赞] [哈哈] 替换成 图片方法:emotions格式 : filemotion (value, emotions) { value = value.replace(/(\[.+?\])/g, (e, e1) => { for (var i in emotions) { if ((emotions[i].value.indexOf(e1)) > -1) { return ' ' } } }) return value }
 7. axios 更改请求头:
axios.post('/api/comment/',参数, { headers: { 'Content-Type': 'application/json' ...... } }) 8. Proxytable设置跨域,进行数据交互
proxyTable: { '/api': { target: 'http://127.0.0.1:5000', //目标接口域名 changeOrigin: true, //是否跨域 pathRewrite: { '^/api': '/v1/api/' //重写接口 } } } 9.router 模式
路由 mode="history"模式 当前端项目结合到flask 项目中,当vue 路由为history模式时,出现“刷新页面报错404”的问题这是因为这是单页应用…其实是因为调用了history.pushState API 所以所有的跳转之类的操作都是通过router来实现的,解决这个问题很简单,只需要在后台配置如果URL匹配不到任何静态资源
进入新页面,不回到页面顶部解决:
scrollBehavior (to, from, savedPosition) { return { x: 0, y: 0 } },